Monday 30 May 2011

Hottie cover in progress

After a quick sketch on the back of an envelope, a quick trawl through the scrap fabric boxes and a cup of tea, I got started on my hottie cover for the Hottie Challenge over at Curlypop's blog in aid of the Margaret Pratt Foundation Heart Lung Transplant Trust.

I'm still playing about with placement of the flowers etc. I'm sort of winging the sizes of the shapes. I cut out a circle for the red spotty yoyo hoping it would be the right size and as luck would have it, it was perfect.


I need to pin the layers of each side (upper layer + puffy lining + orange cotton layer) together but for now, I wanted to see how it would look. Have not decided on a colour for the bias binding yet.


It's looking quite nice so far. Quilting the layers together is the next task. Should be fun. It's a Bank Holiday Monday here in the UK (day off work, yay!!) but we're mostly spending the day indoors at home as it's miserable and wet outdoors.

Sunday 29 May 2011

The Hottie Challenge update

I recently blogged about fellow blogger, Curlypops's new challenge over at her blog in aid of the Margaret Pratt Foundation Heart Lung Transplant Trust in Australia.


I had decided to join in and Curlypops sent me my kit which arrived in the post a few days ago. There's a standard template which I have to use and the hottie cover must be openable at the top / neck so as to display a cardboard cutout which was sent in the envelope. That's the only rule there is to the challenge.

I'm still mulling over a design. Quilted or appliqued or both? I shall ponder it further and let you know how I get on. I have to make a start on it asap as the entries must reach Curlypops by 23 June and I need to post it to her all the way from my end of the globe.

Hope you're having a great weekend, friends.

Saturday 28 May 2011

Happy birthday Missy Moo!!

This is Missy Moo a couple of weeks after she was born.


I can't believe that was 4 years ago!! When she was born, a small ... albeit very small ... tiny ... miniscule ... part of me wanted to snatch her from the midwife and stuff her back inside me to keep safe and warm and still a connected part to me. Hmmmm, on second thoughts (thoughts about cankles, thoughts about my toes being so far away and out of sight it was like they were on another continent, thoughts about the post-baby blubber I carry around like the proverbial spare tyre which I am incidentally still trying to rid myself of) .... maybe out is best after all.

She is loud, vivacious, ever so stubborn yet funny, loving and bright as a button. She loves to sing, throw a few dance shapes on the patio and harrass her big brother until he grits his teeth in exasperation. She always comes looking for me to see what I'm doing, even when I am in the littlest room of the house taking nature calls. She'll yank the door open, grin at me and say "Mommie, whatcha doin?" (I blame Isabella out of Phineas and Ferb for the constant use of "Wotcha doin?" said in a sing-song voice) She adores all things pink and princessey.


She goes to infant school in the fall - yeah, this fall!! As in September 2011!!! Waaaaahhhhhhh!!


I love this kid and I don't even want to think about or imagine the hole that's going to be left in my heart when I wave her off on her adventures in life 14 or so years time down the road. For now, I'll just enjoy the fullness of my heart.

Happy birthday, Missy Moo.

Friday 27 May 2011

The Viking boy

So last Friday, when I went to pick Dinoboy up from school at 5pm, he said he had a school letter for me which said that he needed to dress up as a Viking on Wednesday for a role-play session they were holding as part of their history module on Vikings. He asked if I could make him a Viking costume.

So the thinking cap went on, a bit of Google research was conducted and a swift trip to the local fabric warehouse early Saturday morning was arranged. I didn't want to spend too much and we figured that his dark (almost black) school trousers would serve as viking trousers sort of as long as we added something to it. We found a metre of brown fun fur and a piece of cheap cream calico in the bargain bin.

I used a large tshirt of Dinoboy's to draft out a quickie paper pattern for a vest and also for a tunic / shift. As we weren't looking for a fitted type of costume, big was fine. Here's the tunic.


And here's the tunic and vest together, accessorised with a wide elastic fashion belt from my wardrobe, a wooden sword from the toy box and furry leg-wraps.


The leg-wraps were just trapezoidal pieces of fun fur with black grosgrain ribbon from my stash sewn in criss-cross lines to give the illusion of bindings. I used velcro to hold them closed. This meant that he could throw them on over his school trousers at dressing up time.


The fun fur vest had shoulder seams and side seams and didn't need hemming. Yay!


On Tuesday night I was trying to convince him to let me make him a viking hat of sorts with yellow braids sewn in (LOL!!) but he was having none of that! Shame - imagine how cute he would have looked?!!

Thursday 26 May 2011

Psssst!! Freebie alert!

I just spotted this on Grosgrain's blog and thought I'd bring it to your attention too.

Sarai of Colette Patterns has got a freebie pattern to download from her blog. Check it out here.


Photo borrowed from the Collette Patterns website.


Cute, huh? I've just downloaded it and am off to try to figure out what fabric I have in my stash which would be good to use for this top.

Wednesday 25 May 2011

My creative space

The space is currently in that between-projects phase. I finished the Simplicity 2599 top I was making and then set about whipping up a quick viking costume for Dinoboy for a school event (more about that later). The space is littered with bits of fluff from the fun fur I used and teeny bits of the crepe de chine.

Once I have cleared all of that away, I shall work on this ...


It's another quillow. The ribbed fleece will be the blanket and the funky printed fleece will be the pocket. There's enough printed fleece to make 2 or maybe even 3 pockets for quillows. I might just have to drop into the local furnishings store to see if they have any plain fleece throws in the upcoming sale at the weekend.

Hop over to the new home of creative spaces to see what others are getting up to this week.

Have a creative day, friends.

Simplicity 2599 top number 2

After the successful muslin I made of the ruffle front Simplicity 2599 top, I bought myself some pretty crepe de chine and made a second one. Here's how it turned out.


I now know that the fabric for the muslin was more like a satin than a crepe de chine. The red crepe de chine has a finer handle and frays like crazy if you even look at it. It was seriously a bit of a pain to sew with and I am certain that my hem is crooked. But it hangs beautifully and the ruffles are soft and sit nicely.


It's the perfect weight for a summer work blouse. I found the lightness of the fabric made the sides of the opening at the back saggy. I also realised I need a lot more practise at sewing lightweight fabrics like this - the top-stitching is all over the place and wonky.


It's a nice top nevertheless and I'll get a fair amount of wear out of it this summer. I hope your week is going well so far, friends.

Thursday 19 May 2011

My Creative Space

There is another Simplicity 2599 top all cut up and ready to sew on my creative space today. This is a polyester crepe de chine. I rather like the colour.


I'm going for another ruffled one like the last time. I'll keep you posted on my progress.

What are you up to today?
Visit the home of creative spaces for inspiration.

Have a creative day, friends.

Sunday 15 May 2011

My fleece quillow tutorial

I’ve made quite a few fleece quillows over the years. We have maybe four or five around the house of varying sizes. The kids have one each, there’s a baby one from Dinoboy’s toddler days, Mr CraftyAdy has one and I have one too. I love making them to give as gifts. It’s a really quick sewing project – especially if you use a store-bought fleece blanket or throw.

In case you don’t know, a quillow is a blanket (or a quilt –hence the name) with a pocket. The blanket folds up into the pocket, creating a pillow. You can pretty much make a quillow from any blanket or quilt. All you have to do is attach a pocket with a finished width which is a third of the width of your blanket plus roughly 1 inch for seam allowances and a length of about a quarter of the length of your blanket plus 1 to 2 inches again for seam allowances.

Now the pocket isn’t just for tucking your blanket into. When using the quillow, the pocket makes a really nice foot-cosy for tucking your feet into.

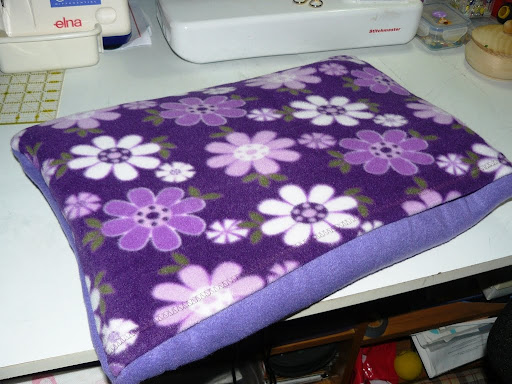
Here’s the quillow I made over the weekend.
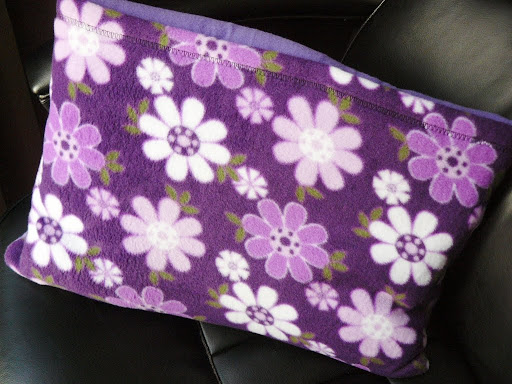


Actually, I made 3 identical ones. I had recently purchased 3 fleece throws from a local warehouse sale. I then bought a metre of the purple floral print fleece off Ebay. It probably took me just over an hour to make all 3 and I was working slowly (with lots of interruptions from Missy Moo). The fleece throws I bought measured 140 cm by 200 cm.

When finished, the blanket tucks into the pocket. See?


There are lots of tutorials on the internet which tell you how to make a quillow. I thought I’d add my own photo tutorial to the list.

So – to make one of these, you’ll need:
1) a fleece throw or blanket
2) a contrasting piece of fleece for the pocket
3) matching thread

I like my quillows a little fat. This means more folds of the blanket inside the pocket. Most tutorials say to go for a pocket that is a quarter of the length of your blanket. For this one, I’ve gone for a sixth. So I measured my fleece blanket again to be sure and determined it was indeed 140cm by 200cm. I then cut a pocket from the printed fleece measuring approximately 49cm by 36cm. I pinked the edges of the pocket piece with my pinking shears to make the edges pretty. You don't have to use pinking shears if you haven't got a pair. Fleece fabric doesn't fray.

(So - just to recap, whatever size your blanket is, you'll need a pocket with a finished width which is a third of the width of your blanket plus roughly 1 inch for seam allowances and a length of about a quarter of the length of your blanket plus 1 to 2 inches again for seam allowances.)
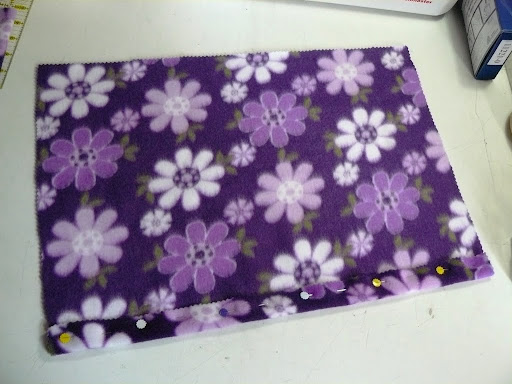


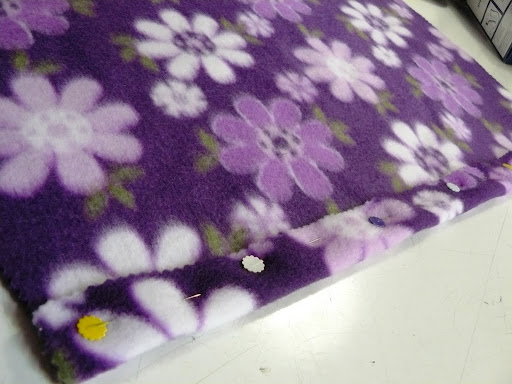
I then turned down one of the wider edges by approximately 3 cm and pinned it.


Then using this stitch on my machine …


…. And my walking foot … (By the way, I'm using my walking foot because my sewing machine is not very keen on sewing fleece material with a regular foot. No idea why. I've found that it's easier to sew fleece on my sewing machine using my walking foot.)
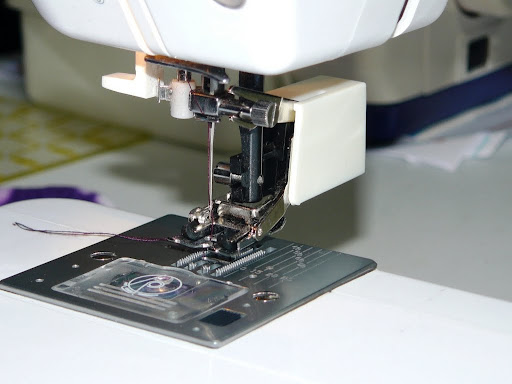


I sewed a line of stitching all the way along to the end.
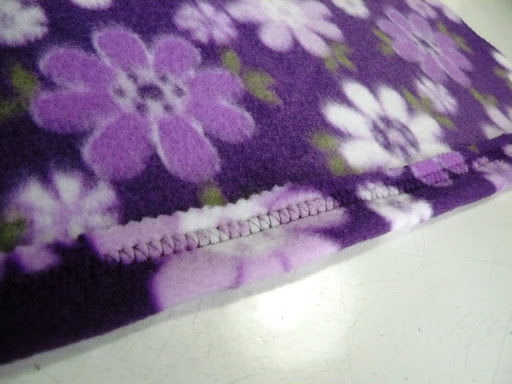


This forms the top edge of the pocket. You can use any stitch you like really. I like this one as it’s kind of decorative and matches the hemming stitches in the blanket.


Take the blanket and fold one of the narrower sides in half. Make a chalk mark to note the center point. My blanket didn’t really have a right side or wrong side. If you are using a blanket which has a right and wrong side, you should make your mark on the wrong side of your blanket.
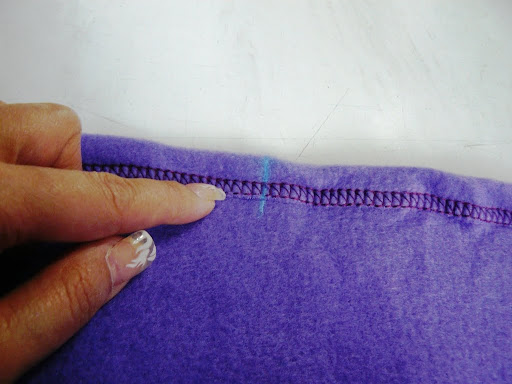


Fold the edge at the bottom of the pocket in half, right sides together. Locate the middle point and make a chalk mark. Remember that this mark should be made on the right side of the fabric.


Spread the blanket out flat. Placing the pocket right side down onto the blanket, match up the two chalk marks. The edge of the pocket should sit along the edge of the blanket. Smooth the pocket down with the palms of your hands to ensure both the blanket and pocket lay flat. Then pin in place.


Following the direction of the arrows, sew down one side of the pocket using a half inch or 1.5 cm seam allowance, starting from the red star (back-stitch a few times at the beginning to strengthen the corner of the pocket) down towards the bottom of the blanket. Then sew across the bottom of the pocket and back up the other side until you get to the top of the pocket where the little red heart. Back-stitch a few stitches to secure and strengthen that corner of the pocket.
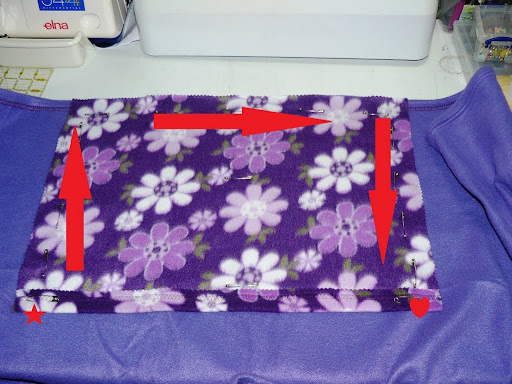


Remove your pins and you’re done! Now to fold your quillow:
1) Turn your quillow so the pillow is underneath the blanket.
2) Fold in each side so blanket is in thirds.


3) Then fold the blanket over in half, bringing the one end up to meet the other end where the pocket is.


4) If you have made your pocket so it’s a quarter the length of your blanket, then you just have to fold over in half again. If like me, you’ve decided to make your pocket one sixth of the length of your blanket, then you have to fold it in by a third …


… and then fold again.


5) Now flip the quillow over like this …


6) Stick your hands into the pocket and grabbing the blanket ends, turn the pillow right side out tucking the blanket into the pillow.
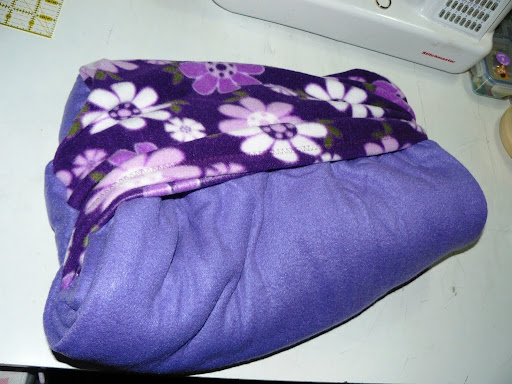


Here you have it – your quillow.


I hope you find this tutorial helpful.
Happy sewing, friends!

The Hottie Challenge at Curlypops

Fellow blogger, Curlypops, has started a new challenge over at her blog in aid of the Margaret Pratt Foundation Heart Lung Transplant Trust in Australia.


I decided to join in. So watch this space!

If you fancy having a go, then have a look here for details.

I've been working on a really quick sewing project and took some photos last night. Look out for a tutorial coming your way shortly.

Hope you're having a great weekend, friends.

Thursday 12 May 2011

My creative space

The space is quiet and empty today as I am in that momentary lull between projects. I've just completed my Simplicity 2599 muslin (or test garment) and will get started on another one tonight I hope.

The muslin turned out surprisingly well given how slippery the fabric was.


I was particularly pleased with the button and loop closure.


Here's the muslin I made. It turned out very wearable and I think I'll get a lot of wear out of this over the coming summer months.


Creative spaces have a new home here. Why don't you drop in for a visit and see what others are up to all around the world.

Have a creative day, folks.

Wednesday 11 May 2011

My Simplicity 2599 muslin

There are lots of reviews here for Simplicity 2599 and PatternReview.com voted it as one of the top patterns for 2010.

I wanted some new tops for work during the summer months. I had seen the ruffled silk top in Boden (see my last post) but was put off by the price. So when I saw this on Patternreview.com and read all the positive comments, I thought I'd give it a go.

The fabric I bought has a bit of a busy print as you can see. At £3 a metre - plus it had the right sort of silky handle I was loking for - it was a good buy.


The ruffles sort of get lost in the print. As this was intended to be a muslin, I wasn't too bothered about the print (I actually quite like it) being busy.


Pattern Description:
Six different designs of tops, with separate patterns for B, C, and D cup sizes. I chose view D which is described as a shell top with three horizontal ruffles under the neckline. Only I added an extra ruffle making it four horizontal ruffles in all.

Pattern Sizing:
The pattern is sized 12 - 20 and I cut a size 16. From my measurements and the instructions given, I cut the B cup pattern. It fitted really nicely.

Did it look like the photo/drawing on the pattern envelope once you were done sewing with it?
Yes it did - except I added the extra layer of ruffle.

Were the instructions easy to follow?
Yes. I was surprised at how easy it was - although I did struggle very slightly with the facing - especially on the front where the ruffles were.

What did you particularly like or dislike about the pattern?
How easy it was, once I tamed the front facing. The neck facing didn't sit flat, even with the understitching. And the ruffle stuck out like one of those funny dog collars the vet gives your dog when they want to stop the dog scratching. It could be due to the thickness of the double layer ruffle (each ruffle comprises a double layer of fabric). I rolled the facing forward a little and 'stitched in the ditch', tapering the roll of fabric off towards the shoulder seam. This left me with a section at the front neckline which looks like it's been bias-bound. I might actually use bias-binding on the neckline next time instead of the facing.

Fabric Used:
A cheap polyester silky handle fabric - it's a woven. I have a feeling it's a polyester crepe de chine. It doesn't crease at all and feels lovely on.

Pattern alterations or any design changes you made:
I added an extra ruffle but made it slightly shorter than the other three.

Would you sew it again? Would you recommend it to others?
Yes! I will most definitely sew this again, and possibly one of the other views, although I do really like this one! And YES - I wholeheartedly recommended this pattern.

Conclusion:
I love this pattern! I've actually finished this top and will wear it to work today. Hurrah for wearable muslins! I didn't get a chance to take a final photo of the finished garment last night. I'll do that as soon as I can.

Have a lovely day, friends.

Tuesday 10 May 2011

A card and news of a WIP

I am doing well on one of my new year's resolutions to not purchase any birthday cards at all this year. It's May and I have yet to buy a birthday card from the shops. Most of my cards are very girlie as you may recall from previous posts. But I recently needed a boy card for my god-son who turned 6 a week ago. Here's the card I made for him with a sheet of scrapbooking paper I found in a local shop.


I am currently working on a project which was inspired by this top here at Boden. I liked the look and the ruffles but was not keen on the price tag and some of the reviews were not positive.

So enter the WIP aka Work In Progress. I started searching through all the pattern sites (you know which ones I mean ... Vogue, Butterick, Simplicity) and I found this pattern.


I thought the top in yellow on the pattern cover looked like the Boden top only with smaller frills. So I now have this pattern and I bought a cheap and cheerful silky polyester bit of fabric from the local fabric shop (£3 per metre in the sale rack) to do a muslin with. I'm halfway there and it's looking very positive.

I'll share more tomorrow.
Have a great day, friends.

Friday 6 May 2011

A spot of sewing

I recently went to a good friend's house and her mother-in-law was telling us about her new phone. She was so worried about scratching the screen, she kept it tucked into a sock in her handbag.

I decided that the sock needed to be replaced by something better. So I made her this phonecase using my glasses case tutorial.


It's got a flex-frame opening. See?


It's a glasses case really but I shortened it by an inch or so and added a loop so I could thread on a nice silver split ring. She was delighted with her new phonecase and the sock went back into the sock drawer.

I hope to do more sewing this weekend ... not sure what yet. What are your plans for the weekend?

Whatever your plans, have a great weekend, friends.

Wednesday 4 May 2011

A bit more chalk fun

Here are the last two chalk drawing photos Dinoboy and I made last weekend.

A nod to Harry Potter ...


And a moment to relax ...


I think I might try digging about in the loft for my pastel chalks from my arty days and have a go at doing more on the patio over the summer months. I am hugely inspired by these guys who do the most amazing Trompe d’oeil pieces with chalk on street pavements.

One of my favourite pavement chalk artists is Julian Beever.

Here is a link to 44 of his top pieces.

Another amazing artist is Tracy Lee Stum.


Kurt Wenner's chalk drawings are incredible too.


I also like Edgar Mueller's work.


Don't these guys (and gal) just take chalk drawings on pavements to a whole other level?

Hope you're having a good day, friends.